The Page Visits report allows you to see all of the pages and the number of times that they have been visited by Prospects over a period of time. This report will include pages on your website, landing pages created in eTrigue, and any third-party pages that were linked in your emails.
Hovering your mouse over an individual data segment in the report reveals the number of total visits by Prospects to that specific page URL.
Clicking on an individual data segment will take you to the drill-down list of unique Prospects that produced the total visits to that specific page URL.
To create a 'Page Visits' report:
- Go to Reports > New Report > Visits by Page. This will open a default report, which you can customize using the settings and filters listed down the left side of the report.
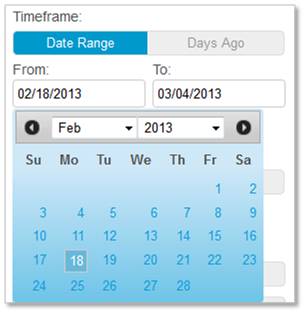
- Under Timeframe, specify the period of time for your report:
- Date Range - Change the date range by clicking on a date within the calendar widget.
- Days Ago - Under Last, click on the number of days ago that you desire.
- Date Range - Change the date range by clicking on a date within the calendar widget.
- Under Prospects, choose Known or Anonymous.
- Known - Prospects that have received a "Known Visitor" cookie by either clicking on an eTrigue trackable link in an email or by filling out an eTrigue Standard Form or Dynamic Progressive Form.
- Anonymous - Prospects that have NOT received a "Known Visitor" cookie yet.
- Known - Prospects that have received a "Known Visitor" cookie by either clicking on an eTrigue trackable link in an email or by filling out an eTrigue Standard Form or Dynamic Progressive Form.
- Under Companies / ISPs, choose Allow or Exclude.
- Allow - Companies and Internet Service Providers (ISPs) that are on the Exclusion List will be included in the report.
- Exclude - Companies and ISPs that appear on the Exclusion List will not be included in the report.
- Allow - Companies and Internet Service Providers (ISPs) that are on the Exclusion List will be included in the report.
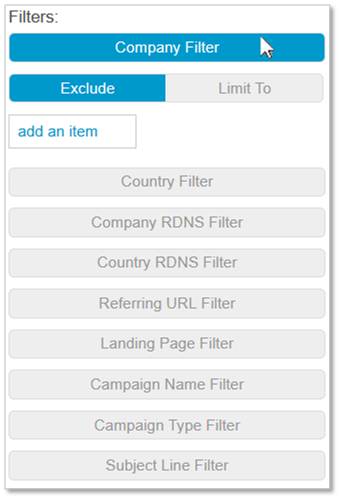
- (Optional) Add Filters to refine the data that is included in your report:
Note - Any filter that contains RDNS refers to data obtained by a reverse DNS look-up on the IP address associated with the visiting Prospect. A Prospect's observed IP address may vary from visit session to visit session.
- Company Filter - Filter based on values in the standard eTrigue Company field.
- Country Filter - Filter based on values in the standard eTrigue Country field.
- Company RDNS Filter - Filter based on values in the standard eTrigue Company RDNS field.
- Country RDNS Filter - Filter based on values in the standard eTrigue Country RDNS field.
- Referring URL Filter - Filter based on values encountered in the standard eTrigue Referring URL field. Data for the Referring URL field is populated for each individual visit session. A Prospect's observed Referring URL may vary from visit session to visit session.
- URL Filter - Filter based on the URL of the Pages.
- Campaign Name Filter - All visited Pages within a visit session are associated with the prospect’s MOST RECENT Campaign ID. By specifying a Campaign Name in the filter, any Pages visited during a visit session that was associated with that Campaign Name will be filtered.
- Campaign Type Filter - All visited Pages within a visit session are associated with the prospect’s MOST RECENT Campaign ID. By specifying a Campaign Type in the filter, any Pages visited during a visit session that was associated with that Campaign Type will be filtered.
- Subject Line Filter - By specifying a Subject in the filter, any Pages that were visited as the result of clicking on an email with that Subject will be filtered.
- Advanced Criteria (for Known Prospects only) - Filter based on criteria found in the List Builder. Users can select specific criteria to include only those prospects that match. For example, you can select 'First Name does start with A' AND 'Company does contain Inc' to include prospects whose first name starts with A and is from a company that contains Inc in its name.
- Company Filter - Filter based on values in the standard eTrigue Company field.
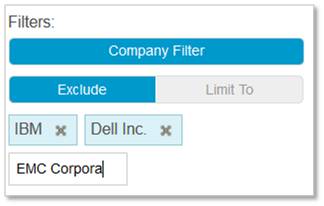
- Under Filters, click on the name of the Filter that you would like to apply. The name of the Filter indicates the DemandCenter field that will be evaluated. Prospects and data will be filtered from the report based on the values in the field(s) that you choose:
- After a Filter is selected, choose how you would like your filter to be applied:
- Exclude - Prospects will be removed from your report if their field data exactly matches one of the tags that you provide in the next step (matching is not case sensitive).
Example - If you use the Company RDNS Filter to EXCLUDE "IBM", then all Prospects that have exactly "IBM" in their Company RDNS field will be excluded from the report; Prospects that have "IBM Corp." in their Company RDNS field will continue to be included in the report.
- Limit To - Prospects will only be included in the report if their field data exactly matches one of the tags that you provide in the next step (matching is not case sensitive).
Example - If you use the Country RDNS Filter to LIMIT TO "US", then only Prospects that have exactly "US" in their Country RDNS field will be included in the report; Prospects that have "USA" , or any other value in their Country RDNS field, will not be included in the report.
- Exclude - Prospects will be removed from your report if their field data exactly matches one of the tags that you provide in the next step (matching is not case sensitive).
- In the text field that appears under the selected filter, type the exact keyword or data value that you would like to filter (matching is not case sensitive), and then press Enter. The submitted value will now appear in a blue box to serve as confirmation that it has been locked in.
- Repeat step 6.03 for as many filter values as is necessary.
- Repeat steps 6.01 - 6.04 for as many Filters as you would like to apply to this report.
-
Under Chart Type, specify the way that the data for your report will be presented:
- Bar Chart - Each Page URL will be represented as a horizontal bar in the chart. The more total visits to the Page, the longer the bar will be.
- Pie Chart - Each Page URL will be represented as a pie slice in the chart. The more total visits to the Page, the larger the pie slice will be.
-
Under Sort By, specify the sort order of your data:
- Number of Visits - Data segments are displayed in descending order, from those pages with the most total visits, to those with the fewest.
-
URL - Data segments are displayed in ascending alphabetical or numerical order, based on the URL of each Page included in the report.
-
Under URLs to Show, choose the number of unique Pages to include in your report. You may choose to display either 10, 25, 50, 100, or 500 Pages.
- Click Apply when ready to update your report with your configured settings and filters.
- Click Save to retain your new Marketing Effectiveness Report. The Save Report Dialog will appear.
- In the Save Report Dialog, complete the following to finish saving your report:
- Next to Report Name, provide a name for your report.
- (Optional) Next to Description, provide a description of your report.
- Next to Visibility, set the report's availability to other DemandCenter Users:
- Private - The report is only visible to its creator.
- Shared - This report is visible to all Users that have been granted Read Only or Create access to your report's type.
- Private - The report is only visible to its creator.
- Next to Locked, check the box if you would like to make this report ineligible for User edits. If the box is unchecked and your report is set to Shared, then Users with Create access will be allowed to edit and re-save your report.
- Click Save to retain your new Marketing Effectiveness Report.
- Next to Report Name, provide a name for your report.