- Create or Edit your Email or Landing Page template.
- If you have not already done so, follow the steps to upload files into the Content Manager for use with the DemandCenter WYSIWYG Editor.
- While in the Normal view of the DemandCenter WYSIWYG Editor, highlight the existing text that should be linked.
- Click theLink
 icon in the WYSIWYG toolbar -- the Link Properties window will open.
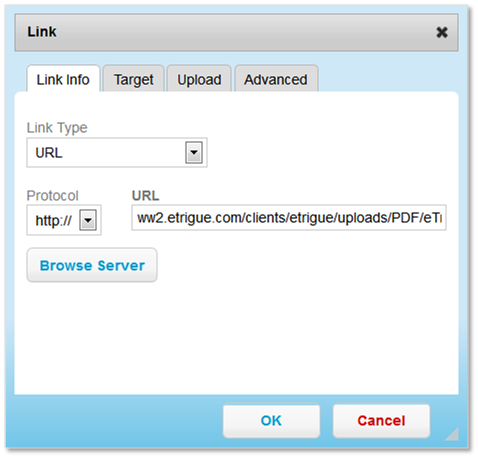
 - In the Link Properties window, click Browse Server -- the eTrigue File Manger will open in a new window.
- Navigate through the file folders in the eTrigue File Manger to locate the asset that you would like to use.
- Double-click to select the asset that you would like to use -- you will be taken back to the Link Info Properties window.
- Click OK to finish linking your asset.
- Repeat steps 2-8, to link additional text, as needed.
- When finished, click either:
- Save: Overwrite the preexisting template with which you started, with your changes.
- Save As: Create a NEW template.
- Save: Overwrite the preexisting template with which you started, with your changes.
To learn how to upload images or files into the Content Manager for use with the DemandCenter WYSIWYG Editor, click here.
To learn about an eTrigue Asset Download, click here.
To learn how to create a new Email Template, click here.
To learn how to edit an existing Email Template, click here.
To learn how to create new DemandCenter-hosted Landing Pages, click here.
To learn how to view and edit your existing DemandCenter Landing Pages, click here.