How do I create a new DemandCenter Email Template?
Go to Assets > New Asset > Email Template. You will be taken to the DemandCenter What-You-See-Is-What-You-Get (WYSIWYG) HTML Editor.
In the Subject field, type a subject for your message. When sent, this will appear as the subject of the outbound email.
In the Body field, under the HTML Message tab, type the text of your message.
(OPTIONAL) Click the HTML button in the WYSIWYG toolbar to view your Email Template in HTML mode. This will allow you to add and modify HTML code in your Email Template.
Use the Sender Tagsbutton to customize your message with Sender Replacement Tags. When emails are sent, these tags are populated with the contact information of the USER that is chosen as the Sender.
Use the Recipient Tagsbutton to add Recipient Replacement Tags. When emails are sent, these tags are populated with your recipient's information from your DemandCenter database. For any given recipient tag, you can provide a DEFAULT VALUE for each tag. The default value will be used when the recipient does not have a value in the eTrigue database.
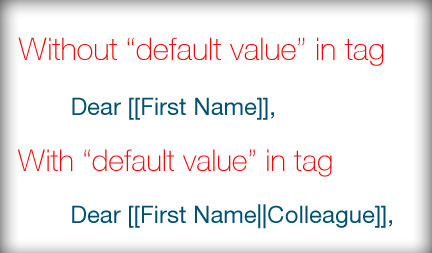
To illustrate, refer to the image below.
In the first example, there is no default value provided for [[First Name]]. Thus, if a recipient was missing a first name, then the email will display "Dear ,".
In the second example, "Colleague" is provided as a default value for [[First Name]]. As a result, if a a recipient was missing a first name, then the email will display "Dear Colleague,".
Add links by selecting the text or images that you would like to link and clicking the button in the WYSIWYG toolbar.
Once the content of your email has been created, give your Email Template a name under the Properties section.
Select a folder to save your Email Template in.
Under Subscription Type, select a Subscription Typefor your new Email Template.
Under Language, select a Languagefor your new Email Template. When creating or editing an Email Template, the Language selector dictates the language that will be used for your Opt-out Message and Subscription Managementitems when sending the email to one or more recipients.
Next to the Cookie prospects that click on links within this message checkbox, uncheck this option if you do not want to cookie prospects who click on your links. Typically, this is unchecked when you are dealing with customers that live in countries with strict international spam laws.
Check Create and send as multi-part MIME email message if you would like to configure a Plain Text version of your email to be used when the system encounters Plain Text email servers and clients.
If you have checked this box, you will be required to configure the Plain Text version of the email. To do so:
Click on the Plain Text Message tab to see the Plain Text Editor.
Enter the text for the body of your Plain Text version. You may either:
Manually type the text for your message in the provided editor.
OR
Click Copy text from HTML -- all text from the HTML Message tab will be imported into the Plain Text Message tab. All HTML code will be removed from the text including all images, formatting, and styles. Hyperlinks will be reduced to just their destination URL.
Insert Prospect Replacement Tags and Signature Replacement Tags as desired. A CAN-SPAM compliant signature block is required.
(Litmus Integration) If your organization has an account with Litmus, you can preview email templates directly within eTrigue with Litmus Integration. To learn how, click here.